Amazing experimental laryngeal masks made by Dr. Archie Brain on his journey from an idea to reality
We will discuss the following aspects. Please scroll down and start reading.
- How the idea of the laryngeal mask first emerged
- Goldman rubber cuffs
- Latex cuffs
- Silicone cuffs
- Trying to increase the seal pressure
- Problem of the epiglottis
- Gastric channel
- Intubation aid
How the idea of the laryngeal mask first emerged
My fascination for the history of the laryngeal mask airway started when I went to a study day at the Association of Anaesthetists in Great Britain and Ireland ( I know it is a tedious long title) located in London. It wasn’t the study day itself that fascinated me. Rather, during the coffee break, I discovered a little museum housed in the building. In this museum holding anaesthesia related historical items, I saw in a glass case, the device shown below. What was on display was a very early experimental version of the laryngeal mask made in the year 1981. As I looked at it, I was completely amazed by how that crude hand made device is a forerunner of the laryngeal mask, which as an anaesthetist, I have ( and probably you have as well) used so many thousands of times.
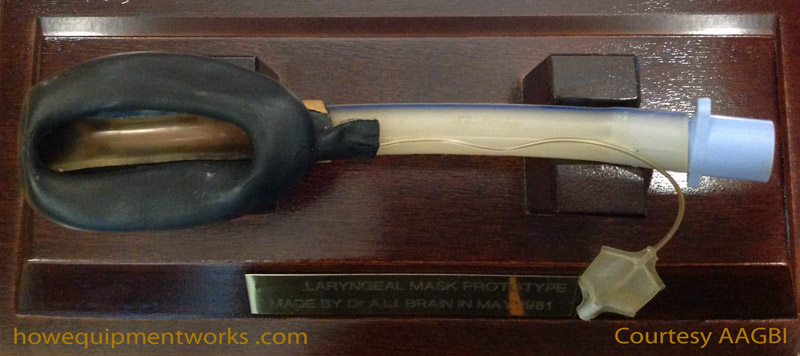
At the time I saw this early laryngeal mask in the museum, I didn’t really know much about the history of this device. I have since looked for more information and have discovered that the history of it associated with many wonderful experimental designs. In this web page, I hope to share with you a glimpse of this fascinating history using pictures of many of the original experimental versions. After reading this, the next time you insert an laryngeal mask, you will know where it all began. However, to appreciate the historical significance of the laryngeal mask, we need to use a time machine and move back to the early nineteen eighties.

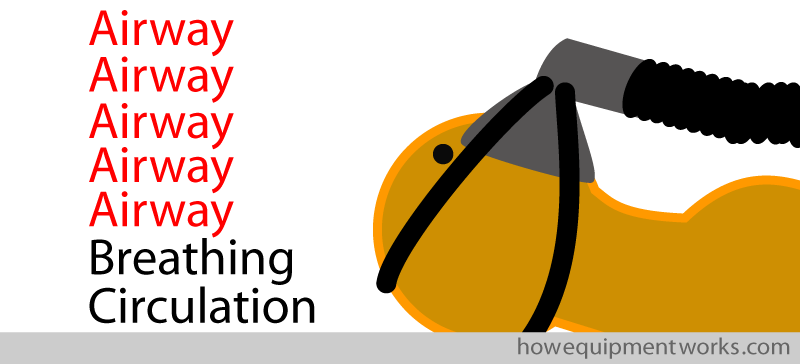
In the early 1980’s, before the laryngeal mask was invented, there were two basic ways of maintaining an airway. One was to use a face mask and the other was to use a tracheal tube. Using a face mask for anything but the shortest anaesthetics was not a reliable way to maintain an airway and it was tedious to hold the mask. One had the possibility of attaching rubber straps to keep the mask in place, but these often didn’t work well. Basically, when using the mask with these straps, one had to often concentrate more on managing the airway than managing the rest of the patient and anaesthetic.
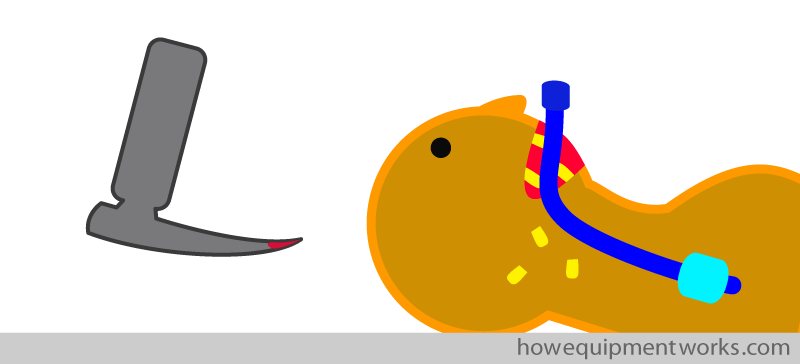
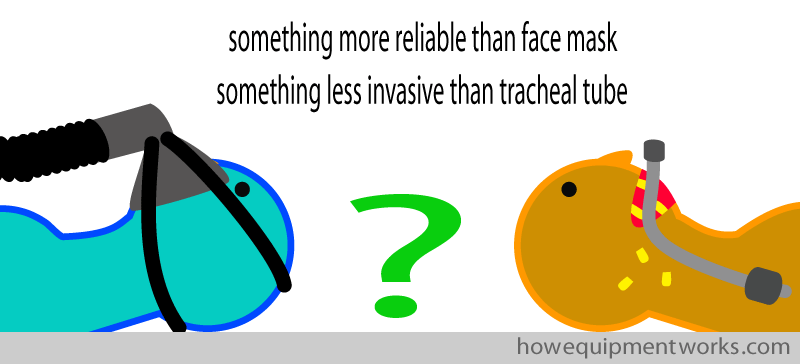
The alternate option to using a face mask was to place a tracheal tube. At times, this was needed for a good reason, such as when giving anaesthesia for a patients with a full stomach. But at other times, it was put in because the face mask wasn’t doing its job well. This meant that, if a more reliable mask could be invented, a large number of unnecessary intubations ( and their associated complications) could be avoided.
Now the hero of this story makes an entrance. His name is Dr. Archie Brain and he (aged about 38 at the time) was working as an anaesthetist in the beautiful island country of Seychelles. While working there, he encountered two difficult airways.
The two encounters with difficult airways got him thinking about if there was a better way of managing patient airways.
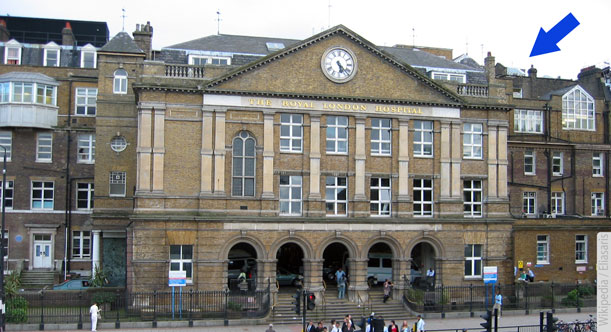
Dr. Brain returned to the United Kingdom and joined the Royal London Hospital in 1981 as lecturer. Decades later, I too trained there, but never knew that it was connected with the birth of the laryngeal mask. The blue arrow points to where the emergency operation theatres were located. I remember how towards the end of the night shifts, some of us would stare out of the windows to see if we could see the day staff entering hospital to take over cases from us.
Initially, at the Royal London Hospital, Dr. Brain was involved in a variety of projects but was not really focused in one direction. Then one day there was a lecture by an American anesthesiologist ( Dr. Lucien Morris) who talked about the problems associated with tracheal tubes and how the future of airway management should take a different direction. Dr. Brain was in the audience listening very carefully.
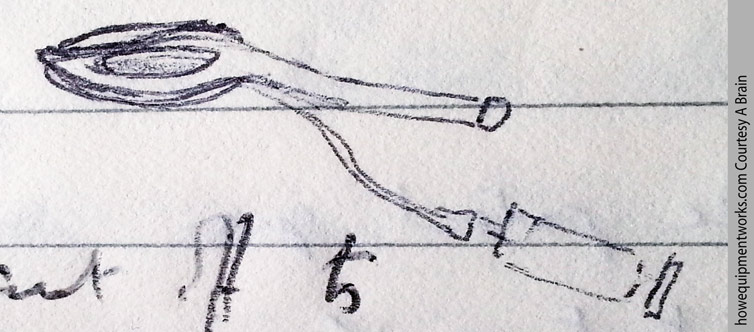
This lecture reminded him about his own quest started at Seychelles, to find an alterative air way management method to that existing at that time. He now focused his research at the Royal London Hospital to finding a suitable airway solution. As he kept thinking of various solutions to the problem, Dr. Brain recorded his thoughts in diaries. Shown below is an actual image taken from one of his diaries. It shows a diagram, drawn in 1981, that shows the laryngeal mask concept, that resembles what we use today, for the first time. It is interesting that this early diagram even has a syringe !
And here is an excerpt from the diary around the period when the drawing was made. I have “translated” his handwriting incase you struggle to read it.
As the above diary entry shows, to better understand the airway, he made plaster casts of actual specimens of the larynx.
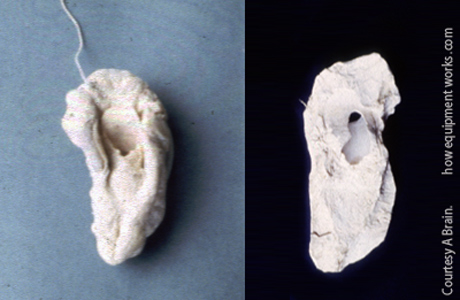
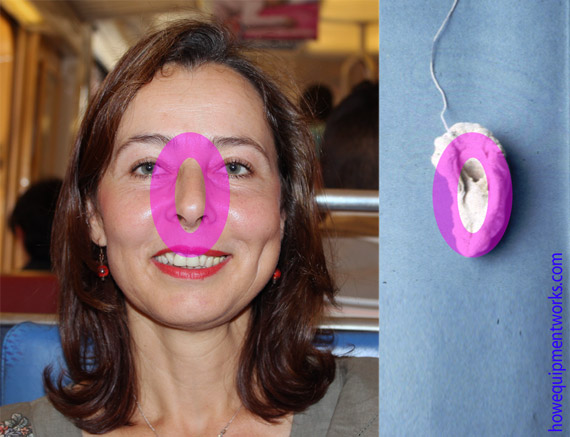
Analysing the casts, he realised that the laryngeal inlet had an oval shape. He wondered if it would be possible to create a seal using such a shape.
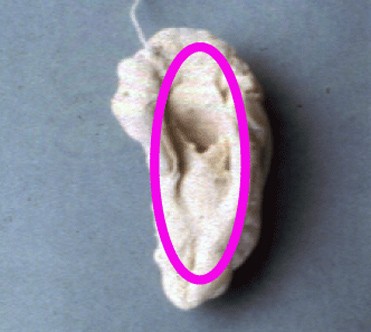
Goldman rubber cuffs
The story of the laryngeal mask has a lot of lucky coincidences. One was that, as part of his duties, he had to anaesthetise patients having dental extractions. At that time, dental anaesthesia involved using a very special mask, called a “Goldman Nasal Mask”. This mask, that was held over the nose, gave the dental surgeon good access to the mouth.

To facilitate cleaning, this mask had a rubber cuff that could be detached ( nothing was disposable back then !). It was these cuffs that interested Dr. Brain.
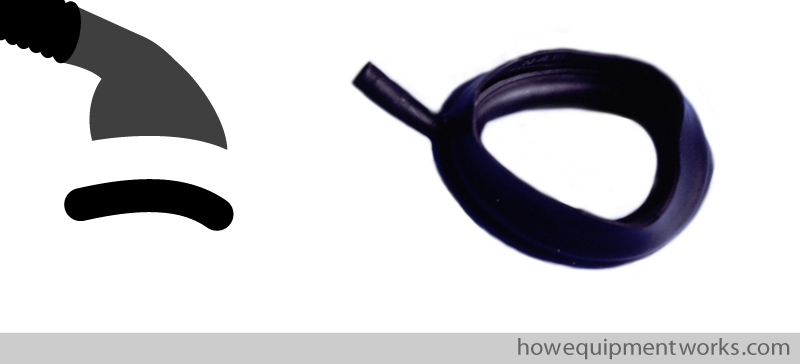
Dr. Brain noticed that the shape (contour) around the nose seemed to be similar to the shape around the laryngeal inlets that he had being studying.
He then wondered if cuffs taken from Goldman Masks, which were normally used over the nose, could be modified to fit over laryngeal inlets.
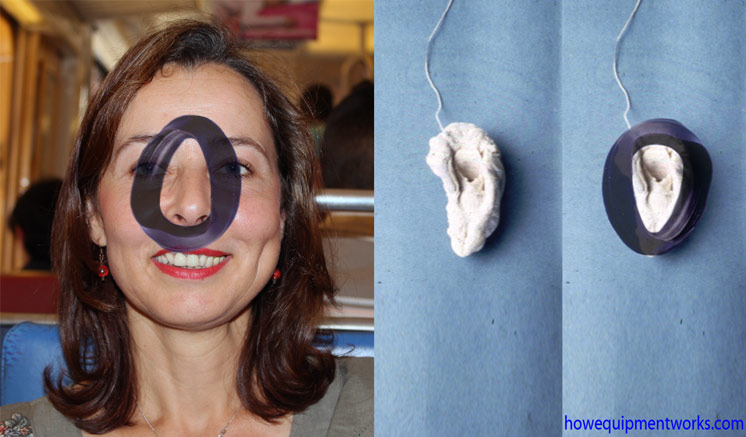
Dr. Brain decided to make an experimental device to study the concept further. He removed the cuff from the Goldman mask.
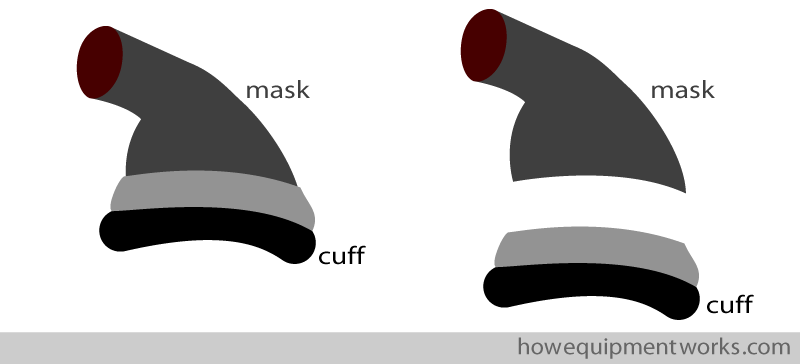
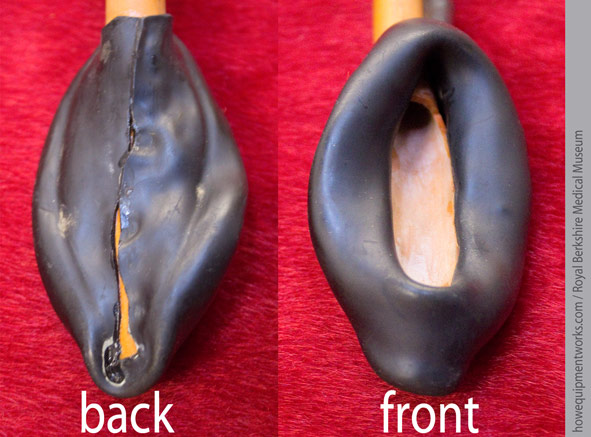
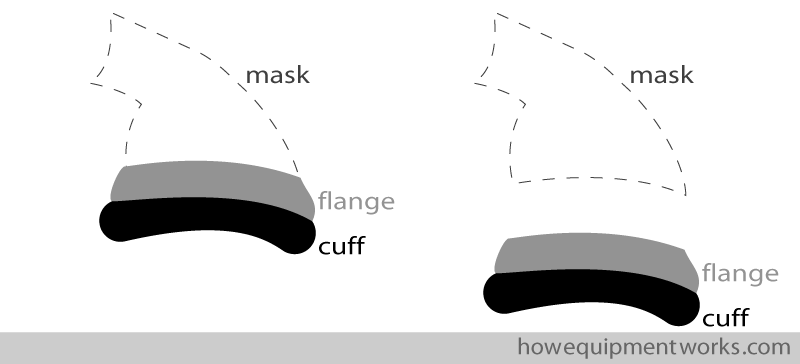
The rubber Goldman cuff had a thin strip around it called a flange (shown in light light grey below). The flange was used to attach the cuff to the rest of the mask.
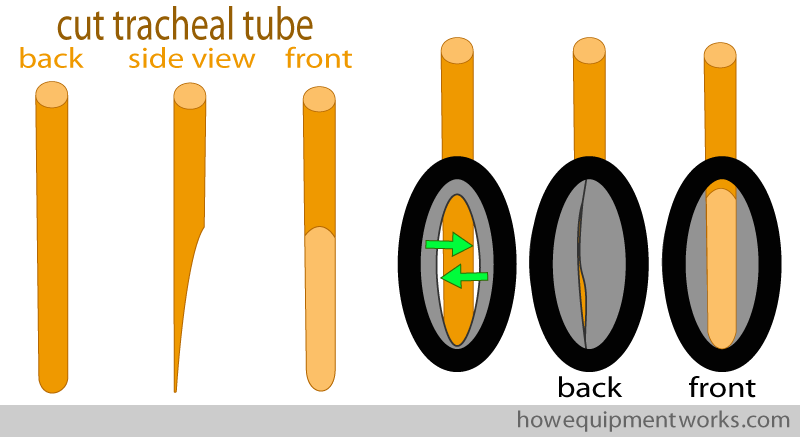
Dr. Brain took a tracheal tube and cut it as shown below. The Goldman cuff was taken and the flange (shown in grey) was brought together and glued onto the cut tracheal tube to form a laryngeal mask.
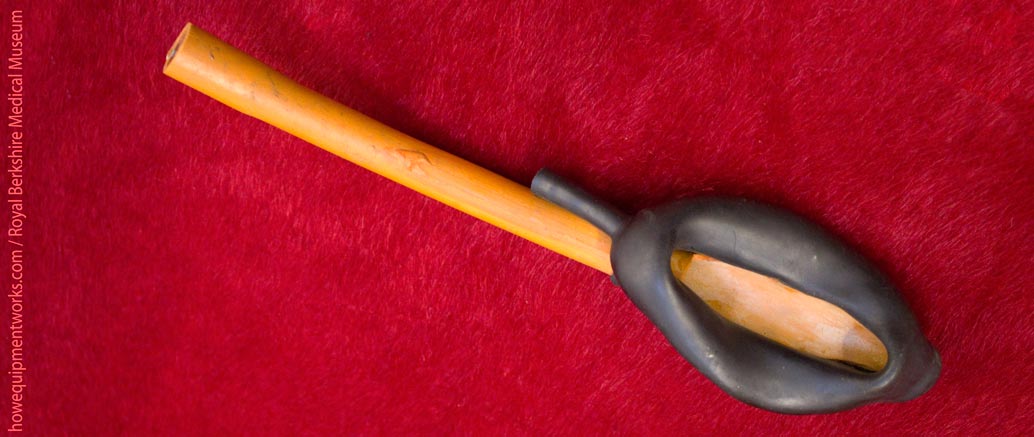
Here is a close up image of a real Goldman cuff based experimental laryngeal mask that shows the above method of construction. In the early days of the laryngeal mask, Dr. Brain struggled to get it commercially produced. He even tried to get them made by hand in the Seychelles and the example below was made by one of the “trainee” workers there. This explains why the gluing is not perfect.
Here is the full view of the above mask.
Here is a version made by Dr. Brain himself.
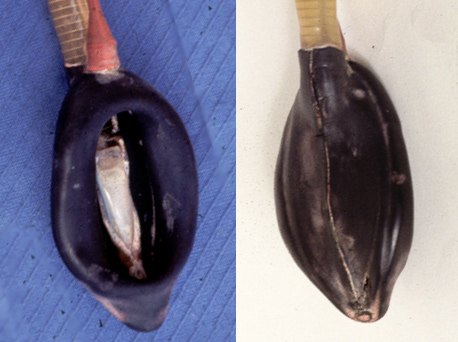
And this is the Goldman cuff laryngeal mask that I first saw in the museum.
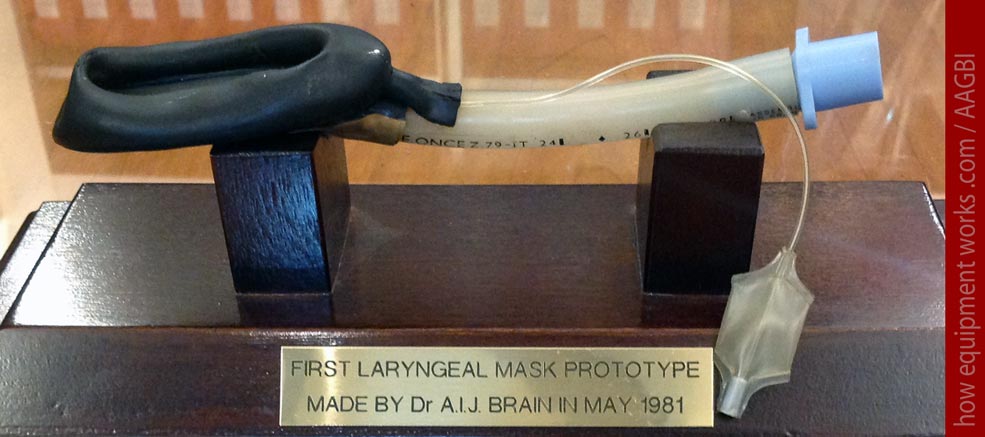
Dr. Brain kept these experimental versions in his car and took them wherever he went. They remained like this for six weeks, till one day in August in 1981, for the first time in the world, one was inserted into a patient. The patient happily breathed through the laryngeal mask and Dr. Brain gently squeezed the breathing system bag and found that it also worked well providing positive pressure ventilation.
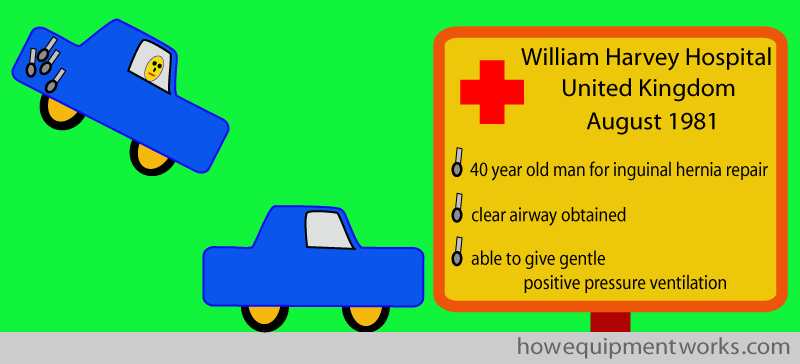
While the first laryngeal mask use was a complete success, for Dr. Brain and the laryngeal mask, the long journey ahead had only begun. There were huge challenges ahead.
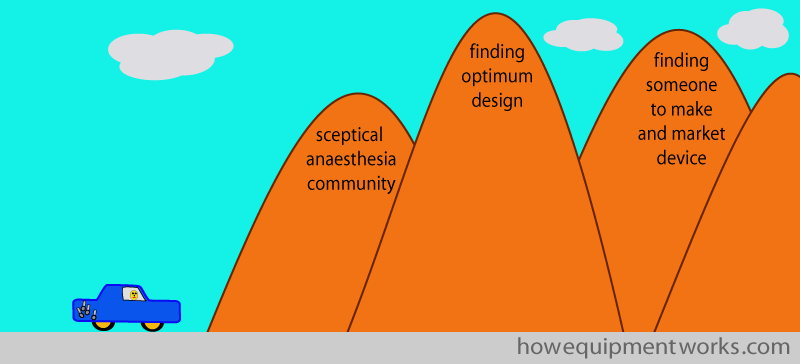
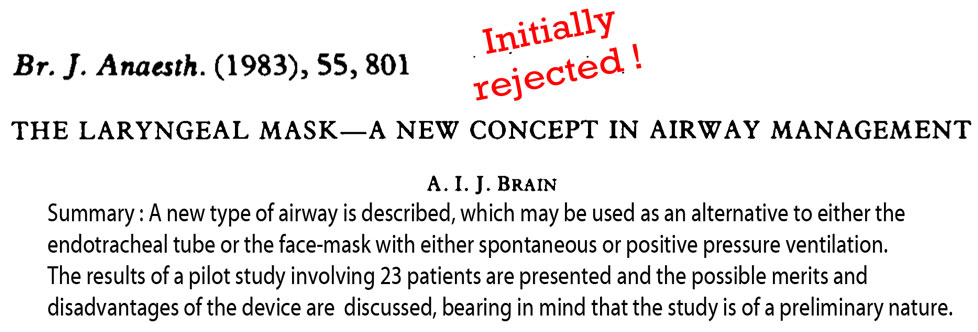
Dr. Brain made a few more experimental laryngeal masks and after getting ethics approval, did a pilot study. There is a lesson here for those of us who lose hope when our submissions to journals are rejected. Dr. Brain’s first submission of this landmark paper was rejected by the journal ! Considering that there are now many thousands of journal articles on laryngeal masks, it is almost unimaginable that the first one was nearly not published !
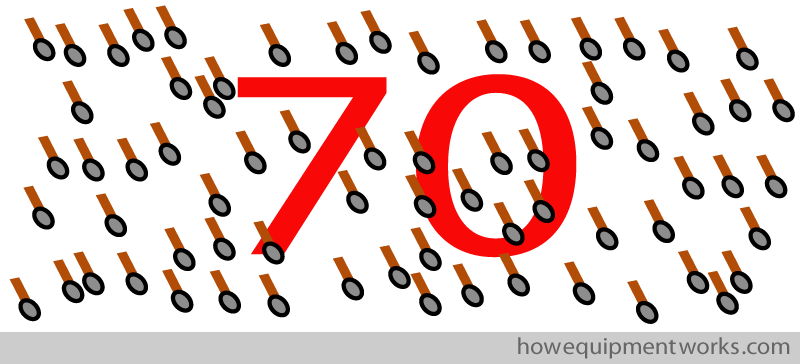
In the first four years of Dr. Brain’s work on the laryngeal mask, he made about 70 experimental laryngeal masks using Goldman cuffs !
Inserting it into himself !
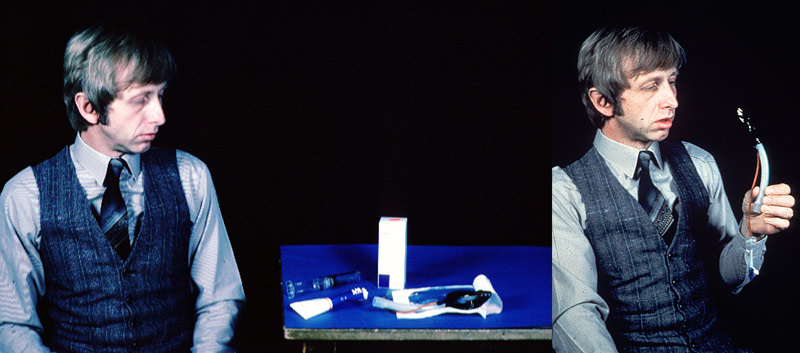
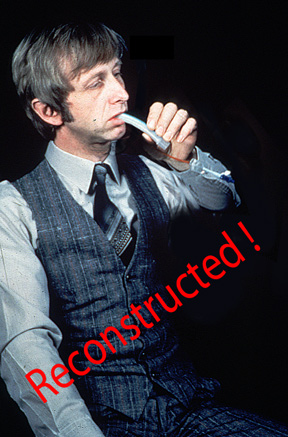
Very early on, Dr. Brain was convinced that the laryngeal mask was gentle to the airway and decided to demonstrate it on himself. In February 1983, he went to the photography department at the Royal London Hospital and asked them to take pictures of him inserting a laryngeal mask into his own pharynx. Dr. Brain sprayed his oral cavity with lignocaine and self inserted it four times. Just imagine what went through the photographer’s mind when Dr. Brain popped it into his mouth ! The image below showing Dr. Brain looking at the laryngeal mask are from that photo session.
Unfortunately the original image of the laryngeal mask actually inside his mouth was lost during one of Dr. Brain’s lectures ( this was at a time when there was no Powerpoint and laptops). I have therefore, using the first two images, reconstructed a third image showing him with the laryngeal mask in his mouth ( scary isn’t it, what computer image manipulation can do !).
At this point, let me tell you how I managed to contact Dr. Brain to help me with information for this website. Dr. Brain was living a peaceful life till I got interested in the early experimental laryngeal masks. The quest to find more information started with my brother in law, Esala Weerakoon ( see photo below). He is a diplomat and was traveling to a place near where Dr. Brain was staying. I asked him if he could try and meet Dr. Brain …. and thankfully he agreed.
I gave my bother in law a letter to hand deliver to Dr. Brain, just in case he was able to meet him. Below are some actual sentences taken from the letter.
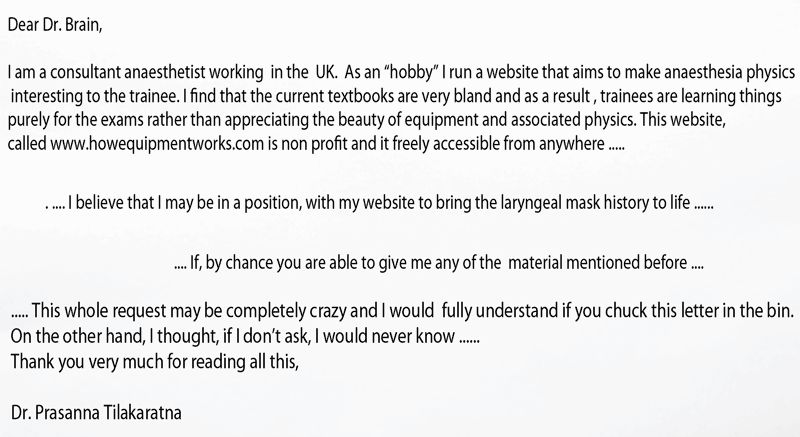
Fortunately Dr. Brain did not throw the letter into the dust bin ! In fact, he has done exactly the opposite. He has been extremely helpful, spending huge amounts of time answering my queries. I was also really fortunate to ultimately meet the great man himself.
Let us now return to laryngeal masks.
Latex cuffs
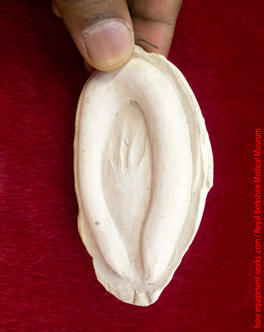
After about four years since starting work on the laryngeal mask, the Goldman cuffs were no longer produced and were hard to come by (maybe Dr. Brain used up all that was left !). Furthermore, the Goldman cuffs were available only in one size and were difficult to make into different shapes. Dr. Brain decided to make his own cuffs using liquid latex ( a form of rubber). This involved hard work as he had to do it all by himself. I will briefly describe the process. First Dr. Brain would make a mould using Plaster of Paris. These were based on information he got from cadaver studies.
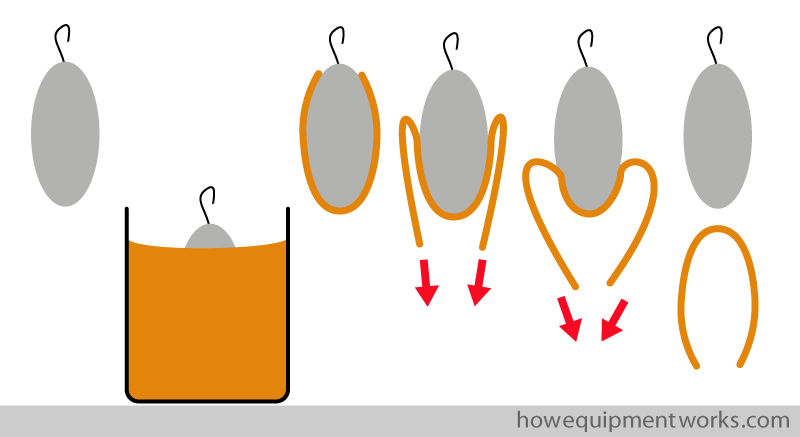
This mould would be dipped in liquid latex and removed. Once the latex that clung onto the mould dried, it would be peeled off to form a cuff. The process took many hours and there were many failures.
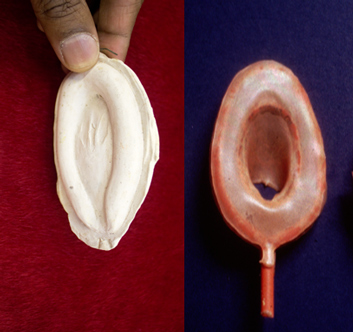
Here is an actual mould and latex cuff.
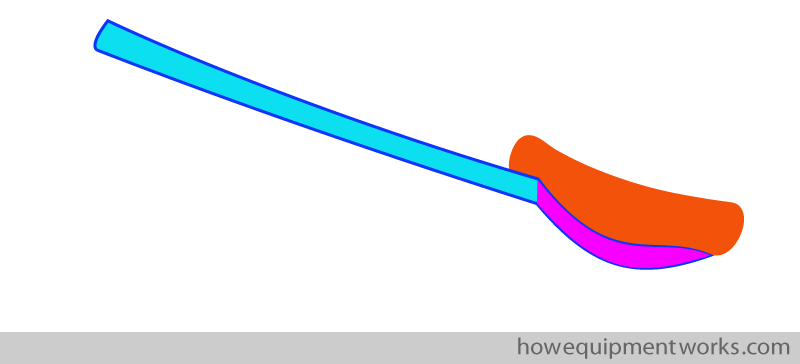
The curvature of the bowl of the laryngeal mask ( pink area ) is an important part of laryngeal mask design. Dr. Brain needed to find a way to make this bowl.
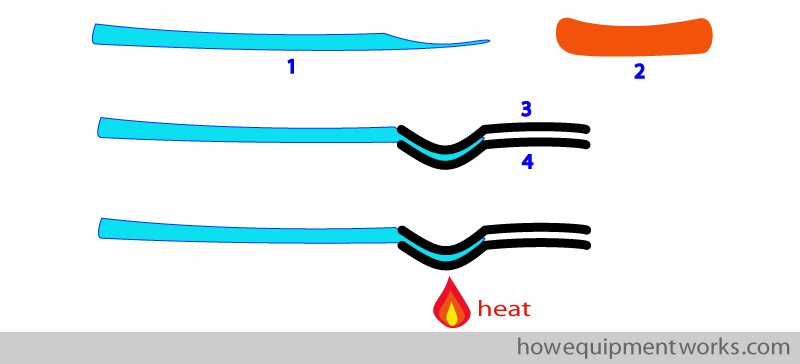
Dr. Brain, as usual, made use of things available around him. To create the bowl shape, he used ordinary teaspoons ! The image below shows a straight ended tube (1) that needs to have a bowl shaped curvature at the end, which would eventually be attached to the cuff ( 2 ). Dr. Brain would put the end of the plastic tube between two spoons which were then heated to make the end soft ( 3, 4 ).
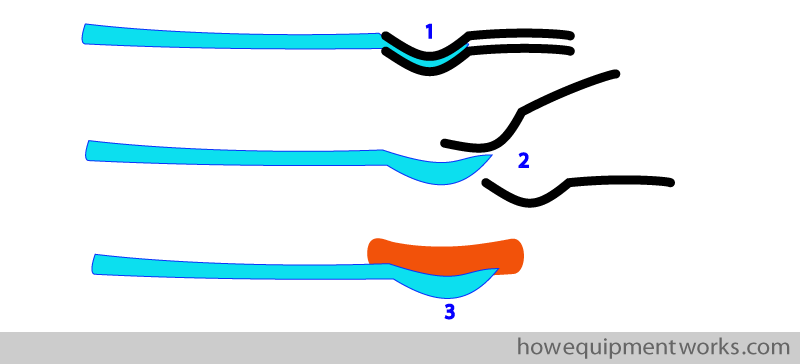
The tube would then be left to cool and harden ( 1 ). When the spoons were removed ( 2 ) , there would be a nice bowl shape to attach to the cuff ( 3 ).
Here is one of the original spoons Dr. Brain used.
However, before going further, I want to share with you a small problem that Dr. Brain faced with his latex experimental laryngeal masks. For a while, Dr. Brain was living in a rented room in the Nurses Accommodation. One day he received a note like this :
A little nervously, Dr. Brain went up to the administrator’s office. It seems that the cleaning lady had seen the latex experimental laryngeal masks hung to dry and thought that Dr. Brain was making toys of a sexual nature ! Fortunately, Dr. Brain was able to convince the administrator that it was all legitimate research.
In fact, even later, a similar issue arose. When the laryngeal mask airway was commercially produced, it was coloured pink by the manufacturer to make it look “clinical”. Dr. Brain received a letter from a president of a religious society who condemned Dr. Brain to the ” Fires of Hell ” if he didn’t withdraw the evil product from the market ! Thank God, Dr. Brain had enough faith not to listen.
Dr. Brain hand made about 85 latex experimental laryngeal masks. He tried different designs and evaluated them for a variety of characteristics such as ease of insertion, ability to make a good seal and reduce sore throat.
Silicone cuffs
The cuffs made out of latex allowed Dr. Brain to experiment with a large number of cuff designs. However, the latex material had its limitations and was difficult to work with. Also, the use of latex did not always result with cuffs that had an uniform wall thickness and smoothness. Dr. Brain hunted for a new material to work with and discovered the Dunlop Rubber Company. At the time, this company was making seals for aircraft doors.
These aircraft door seals were made from a material called silicone, which because of its relative non reactivity, was also particularly suited for medical applications. The Dunlop Rubber Company had a small medical division and Dr. Brain asked them to make some cuffs made out of silicone for him. Shown below are two examples of the cuffs and since they were made by the Dunlop company, we will call them “Dunlop Cuffs”. As you can see, these were not complete laryngeal masks ! Using these cuffs, Dr. Brain would have to painstakingly construct laryngeal masks using his own hands.
At the very beginning itself, there was a problem with the Dunlop cuffs. It has got something to do with the “bowl” of laryngeal masks. Laryngeal masks can have shallow bowls ( blue arrows) or deep bowls ( green arrows).
Cuffs with a deeper, more spacious bowl, are less likely to get obstructed by an epiglottis.
Unfortunately the cuffs provided by the Dunlop company had very shallow bowls.
So Dr. Brain had to modify these Dunlop cuffs to make the bowls deeper. This was not easy to do and Dr. Brain constructed his own little multi purpose machine to do this. The image below shows the machine he made. The subsequent images will show how some of the parts work.
Here is another view of the machine. The “cutter” ( labeled 1 in image below ) was used to punch holes in the cuff ( 2 ). The space between the holes would form the bars of the laryngeal mask (red arrow). These bars help prevent the epiglottis from obstructing the breathing hole.
A short length of tubing made of silicone would be clamped between the jaws of the tool labeled ( 1 ) in the image below. Using this tool as a guide, Dr. Brain would, with a blade, cut the tube into the shape shown in image ( 2 ). This cut tube would be attached to an endotracheal tube (3).
The machine had a specially curved metal plate ( green portion in image A ). The cuff of the future mask and the tube prepared as shown in previous image, are glued together and placed under the plate (image B ). Pressure is applied (pink arrows) and as the glue dries, it retains the curved shape ( C ). This curve gives the laryngeal mask a nice deep bowl ( D ). The process was quite complicated and Dr. Brain spent countless hours perfecting the technique.
Dr. Brain gave Dr. Nunn ( a very eminent anaesthetist at that time) some experimental laryngeal masks made out of the Dunlop cuffs.
Dr. Nunn used these to do the first independent study on the laryngeal mask airway. Despite having only one size of experimental laryngeal mask (approximately equal to a modern size 3 modern one), the study demonstrated the ease of use and good reliability of it.
Dr. Brain had to always improvise. For an example, he wanted to test paediatric cuffs, but unfortunately, there were no suitably small Dunlop cuffs. So he learnt to make smaller cuffs by cutting away the middle portion of large cuffs and joining the remaining pieces together.
In total, Dr. Brain made about 50 Dunlop silicone experimental laryngeal masks. Just imagine the hard work !
When Dr. Brain started to first use the Dunlop experimental laryngeal masks in patients, the cuffs performed so well that he knew, that after so many years, he was finally not far from the goal of having a device that was ready for commercial production.
Here is an summary image where you can see some of the materials Dr. Brain experimented with. The laryngeal mask airway, shown on your right, was the first commercially available and this was made in a factory using techniques suitable for mass production. For an example, the holes in the cuff (and the bars in between) were part of a mould and did not have to be cut out separately.
The strange dream that came true
Having a “good idea” is only the first step in product development. Converting your idea into a commercially available and clinically used product often takes a tortuous and difficult path. Once an idea is developed and tested, you still need to find someone who is willing to manufacture and market it. You might be surprised to know that initially no company was interested in making the laryngeal mask ! Dr. Brain was struggling to find anyone interested. I suspect that many of those who rejected his idea must have felt foolish afterwards !
Then one night, Dr. Brain was on call for the maternity ward in a hospital. While in deep sleep ( obviously it must have been a quiet night !) he had a strange dream where soldiers were landing onto the Seychelles islands ( remember, Dr. Brain used to work there a few years previously).
It was such a vivid dream that he remembered it well on waking up. Dr. Brain had breakfast and made his way to the railway station to go home. There he was shocked to read the following headlines in the morning newspapers ( sorry, I have blurred most of it as I do not have copyright). What he had dreamt that night had actually happened !
Perhaps this strange incident brought the Seychelles back into Dr. Brain’s mind and he remembered that there was a small factory there that made plastic items. Still almost in a dream like state, he contacted the Seychelles High Commission in London. He soon was having a meeting with the High Commissioner ( the highest ranking diplomat in the office). The gentleman was so interested in Dr. Brain’s idea and the potential benefits to the economy of the Seychelles, that he smoked the cigar in his hand to the very end.
Within two weeks, Dr. Brain was in the Seychelles where he met a visionary businessman, Mr. Robert Gaines-Cooper. While Mr. Cooper had no medical background, he was able to see the future of Dr. Brain’s invention.
As mentioned before, taking an idea and making it into a commercially viable product is extremely difficult. In the real world there is a lot of tension between what is clinically desirable and what is commercially desirable. The final design is often a compromise between the various competing requirements.
We now return back to the story of the early experimental laryngeal masks.
The Flower Problem : Why laryngeal mask design is much more complex than tracheal tube design
The design of the laryngeal mask cuff was far more difficult than the cuff of a tracheal tube. I like to think that this is due to the “The Flower Problem of the Upper Airway” .
I know you are confused, so let me explain. Look at these flowers.
Flowers come in a large variety of shapes.
However, you will see that while the flowers have all sorts of shapes, the stems all look alike.
The human upper airway is also similar. Like the flowers, human faces (and pharyngeal shapes) are very varied. However, the tracheas are like the stems, they all have a similar shape.
Because most tracheas look the same, designing tracheal tube cuffs are not that difficult. i.e. a simple design will fit most tracheas well.
On the other hand, the area above the larynx (supra glottic area) varies much more from one patient to the next. Also, unlike the trachea, the supraglottic area has the epiglottis and pharyngeal muscles that may behave differently from patient to patient.This variability is what made the laryngeal mask cuff such a tough challenge to design.
It is not practical to have thousands of shapes of laryngeal masks to choose from. Therefore, Dr. Brain worked hard to find the best shape that would fit the vast majority of people.
Dr. Brain was aiming for the ideal laryngeal mask design.
Dr. Brain used both, his great intelligence and practical skills to search for the ideal laryngeal mask. He would first think of an idea. Then he would, using his own hands, build an experimental laryngeal mask based on the idea he thought of. At times, just seeing how the newly constructed mask looked would convince him that the idea wouldn’t work. At other times, the new laryngeal mask would be used on patients. Based on the feedback obtained, he would rethink the original idea, and make another experimental laryngeal mask to test the new idea. This cycle of thinking and testing was done hundreds of times.
To guide him on the correct path, Dr. Brain kept accurate notes and also made a simple scoring system to evaluate each idea ( don’t try too hard to read his handwriting! ) .
The process of finding the ideal laryngeal mask generated a large number of fascinating experimental laryngeal masks and I hope to share some of these with you. The Medical Museum at the Royal Berkshire Hospital (where Dr. Brain held an Honorary post in the 1990’s) has a collection of the early experimental laryngeal masks and I arranged to visit it to take some photographs. I was expecting to see only a few experimental laryngeal masks, so I got a huge shock to see that there were boxes and boxes of them !
As I live somewhat far away from the museum, I had to leave home quite early in the morning to visit it. Just before leaving, I suddenly realised that I didn’t have a good coloured cloth to use as background material to photograph the experimental laryngeal masks against. So in a hurry, I removed a cover from one of our cushions on the living room sofa and took it along with me to the museum ( my other half was not too happy about this ! ). This cushion cover is bright red, so if you see it in an image, it means that the experimental laryngeal mask was photographed at the Berkshire Medical Museum. The image below shows the red cushion and standing near is Dr. Tim Smith, who organised my visit. By the way, if you work / train near this museum, I strongly recommend that you visit and support it.
As I show you some interesting experimental laryngeal masks, please always remember that they were painstakingly hand made by Dr. Brain himself. Below is a photograph of Dr. Brain in front of a messy work bench.
Money money !
As mentioned before, I was fortunate enough to meet Dr. Brain. When he said that he would be picking me up, I expected to see him coming in something like the helicopter shown below. After all, with all those millions of laryngeal masks, he would be expected to travel in style.
The reality was quite different ! Instead, I was picked up in this tiny car.
Actually, I of course did not mind at all. After all, I myself drive quite an old tiny car. However, I was curious as to why, after inventing something so widely used in the whole world, was he not an billionaire. It turns out that the world of inventing isn’t always full of riches. Very few inventions that are patented (i.e. legally recorded ideas) actually succeed in making any money.
Early in the development of the laryngeal mask airway, Dr. Brain and a few partners formed a company. He gave the intellectual property (i.e. patents) to the company, and then received a portion of the profits the company made. This arrangement was probably not as lucrative for him as it would have been if he had chosen to receive money for each laryngeal mask produced. Dr. Brain preferred to work this way because he could then not get involved with the day to day financial matters of the company. Instead of focusing on money matters, he preferred to channel his energies into designing better laryngeal masks and teaching. In 2006, Dr. Brain’s shares were sold and since then, he doesn’t receive any share related income from the company. Of course the financial benefits pale into insignificance when compared to the benefits the laryngeal mask airway has made to mankind.
Now let us return to Dr. Brain’s quest of trying to make the ideal laryngeal mask.
Trying out various cuff designs
The pharynx has a complex anatomy as explained before with the flowers! Getting a cuff that is both easy to use and which also provides a good seal is difficult.
For an example, Dr. Brain tried to make a cuff that had “exaggerated features”. It was specially designed in such a way that once it was inside the pharynx, it would apply equal pressures around it. Unfortunately, in the specimen below, the latex has hardened after so many years. Hopefully you will imagine how it must have looked when inflated.
The exaggerated cuff design provided a very high quality seal. However, the strange shape of the device made it difficult to insert easily, so Dr. Brain abandoned it. When designing the laryngeal mask, Dr. Brain had to often battle between various desirable properties.
Here is another experimental laryngeal mask. This one seems to have a cuff at each end ! Can you guess what the other cuff is for ?
It took me a while to work out what this extra cuff does. This experimental laryngeal mask was designed for use in emergency situations, where you want to quickly inflate the cuff. Before your emergency situation arises, you would pre fill your “reservoir cuff” ( arrows) with air using a syringe connected to the three way tap.
You then turn the three way tap “off” and remove the syringe. The reservoir cuff now is under pressure with the air you inserted before. Your equipment is now ready for a potential emergency situation !
Imagine that your emergency situation has just arisen arisen ! You quickly insert the laryngeal mask and turn the three way tap to interconnect both cuffs. Like magic, the reservoir cuff empties into the main cuff and your laryngeal mask is instantly inflated !
Here is another experimental laryngeal mask. This one was made to test how thin the cuff wall could be made. Again it involved a compromise.This cuff had a very thin wall and therefore was less traumatic to the airway. However, it was also prone to becoming folded during insertion and was also more likely to get damaged.
This cuff was made out of plastic (PVC). It was judged to be too rough and therefore was not used in patients.
Many of you will be familiar with the “solid cuff” design seen in the device on your right (B). However, Dr. Brain, many decades ago, had similar thoughts. Below is an image (A) of a model of a potential solid cuff laryngeal mask that Dr. Brain made to see how it might look. The design of this device was not taken further and of course at that time, the choice of materials available were limited. If such a device was to be made, it would most likely have been made out of a material called “silicone rubber” ( a type of silicone that has good thermal stability and flexibility).
A small note : This is not the “official” history of the laryngeal mask !
It is important to bear in mind that the material on this web page isn’t telling the full history of the laryngeal mask. I am only giving you a brief glimpse of it using the experimental versions mostly housed in the Berkshire Medical Museum. Dr. Brain Brain spent years and years making many more designs than I have shown in this website. For an example, after the first commercial laryngeal mask was marketed, he made about a further 300 experimental laryngeal masks. So there are many bits of the history that I have left out !
If you would like to know a more “official” version of the history, please read it from a reputable journal. I think the article (see below) written by the senior author Dr. Wilkinson should be free to download from the Anaesthesia Journal website (please let me know if it is not). By the way, some years ago, Dr. Wilkinson anaesthetised me and I rather embarrassingly remember how, as I was falling asleep, telling him to make sure he was giving me enough anaesthetic ! He is a very gracious gentleman and didn’t talk about it afterwards in the recovery area.
Let us now continue seeing some more fascinating experimental laryngeal masks.
Trying to increasing the cuff seal pressure
When a face mask leaks, one can apply more pressure using your hands to make the seal better.
When a laryngeal mask leaks, one cannot put ones hands in (however small they may be !) to press it against the laryngeal opening !
Dr. Brain explored various solutions to this problem. The experimental laryngeal mask shown below is shaped like a shrimp and Dr. Brain therefore called it “Laryngeal Shrimp”. The laryngeal mask tube had a curved spring (pink arrows) that, when the mask was inside the pharynx, would apply pressure onto the mask.
Here is a very interesting experimental laryngeal mask ! Can you guess how it works ?
In this device, the red cuff (see image below) presses on the neck, pulling the blue cuff towards it via the metal supports (green lines). This would result in a very high pressure seal. However, Dr. Brain was not willing to proceed with this idea because he felt it could apply so much pressure as to damage the airways, and therefore it was never used on a patient.
Here is another photograph of the actual device. When I first saw it, I just couldn’t work it out!
Another idea Dr. Brain explored was to have a posterior cuff (shown in pink below), which was an extension of the main cuff. When this posterior cuff expanded, it would push the laryngeal mask towards the laryngeal opening to give a better seal.
This is a somewhat grainy old image of an experimental laryngeal mask showing the posterior cuff.
Below is another experimental laryngeal mask which has a more streamlined posterior cuff. This design achieved a very high quality seal ( allowing positive pressure ventilation using pressures up to 50 cm H2O).
Teaching
Dr. Brain not only kept working on new laryngeal mask designs, but also spent huge amounts of energy and time ( 22 years) teaching the world how to use them properly. Even his teaching methods were associated with inventions. Dr. Brain was not happy with the standard dummies used for airway training. So he sawed one in half in order that one can easily see the airway ( see image below).The heavy base was replaced to make it more compact so that it would fit his briefcase. This head has been to many coffee rooms all over the world, where Dr. Brain used it to teach trainees the correct techniques of laryngeal mask insertion.
The problem of the epiglottis
Here is another mystery device. This was made out of latex ( a natural rubber material) and therefore has deteriorated quite a lot. The big brown thing is the remnants of what was then a cuff. However, the magic in this experimental laryngeal mask lies in the tube. At one end is a wire (green arrow). Can you guess what would happen if you pulled the wire ?
To understand what the above weird device does, I need to first introduce you to a problem that laryngeal masks have to deal with. As you will know, we all (well hopefully all of us) have an epiglottis and this is shown as the little red area in the pharynx below. The epiglottis prevents food (shown in pink) going into the trachea as we drink or eat something.
For the laryngeal mask, the epiglottis can become a problem. It can fold into the cavity (bowl) of the mask and cause obstruction.
Now let us see how the weird experimental laryngeal mask attempted to deal with the epiglottis. I have tried to reconstruct the cuff, which I have outlined in black. The wire loop (blue arrow) goes through the tube and is connected to the tip (green arrow in magnified image).
Since the wire (blue arrow) is connected to the tip, when it is pulled back, the tip bends.
Let us imagine that you have inserted this experimental laryngeal mask and you suspect that the epiglottis (pink object) is obstructing the air flow
Just pull the magic metal wire and the epiglottis gets flipped out of the way !
When you release the wire, the tip flips back. However, the epiglottis remains folded away and you now have an unobstructed laryngeal mask !
Another idea Dr. Brain tried was to use a balloon in the cuff to lift the epiglottis. Below is a latex experimental laryngeal mask showing the little balloon (green arrow).
In this case, if the epiglottis was blocking the air path, the little balloon (shown in green below) would be inflated. This balloon would then push the epiglottis away, clearing the airway. Dr. Brain did not pursue with these means of pushing the epiglottis away since under certain circumstances, the epiglottis could be harmed.
A relatively simpler solution was to design laryngeal masks that had a thinner insertion profile. During insertion, “thick” laryngeal masks ( diagram A ) are more likely to “hit” and fold an epiglottis. This is less likely to happen when inserting laryngeal masks that can be deflated into a thin wedge shape ( diagram B ).
The initial black rubber Goldman mask cuffs were quite thick and difficult to make slim for insertion.
The silicone Dunlop cuffs on the other hand could be deflated to a very thin shape, making them easy to insert and less likely to snag the epiglottis.
Another option Dr. Brain considered was to “hold up” the epiglottis using an arch. In the image below, the cross section of the cuff is shown in pink. On the left, the epiglottis has fallen into the bowl of the laryngeal mask and is blocking it. The image on the right shows how an arched structure could hold up the epiglottis, preventing it from blocking the laryngeal mask.
Here is an image of a real experimental laryngeal mask with the arched design to hold up the epiglottis. However, he was concerned that the holding up of the epiglottis would be traumatic and therefore this was never used in patients. The cuff in the museum specimen shown below was made of latex As you can see, this has hardened over the many decades since it was built.
Dr. Brain tried another approach to solve the issue of getting the epiglottis out of the way. At that time, there was something called an introducer tool that was being trialled. When laryngeal masks were inserted, there were times when it would fold. This tool was designed to make insertion easier with less folding.
The introducer tool was made out of metal and was inserted into the mask to make it stiff.
The laryngeal mask along with the introducer tool inside would be inserted and because it was now rigid, it would resist becoming folded. Once the laryngeal mask was properly seated, the introducer tool would be pulled out.
To solve the epiglottis problem, Dr. Brain modified the introducer tool so that it had a bump at the end. Like a lot of things in this website, the bump shown here in an exaggerated form.
Here is an actual experimental laryngeal mask showing the bump. I will soon explain how this”bump” works.
This modified insertion tool was inserted in the same way as described before.
As the modified introducer tool would be removed, the bump on its end would pull the epiglottis away, preventing it from obstructing the mask opening. While this tool was successful in moving the epiglottis away, Dr. Brain felt that if it was not used carefully, that it may traumatise the epiglottis, and therefore the idea was abandoned.
Another solution to the falling epiglottis was to use epiglottic bars. The concept is similar to water drains that you see in your street. Such drains have bars that allow the water to pass through but prevent large objects getting in and blocking the flow. Similarly, the bars of an laryngeal mask allow the gases to flow but prevent the epiglottis from blocking the pathway.
Here are some early epiglottic bars seen with latex cuffs.
This early silicone experimental laryngeal mask, had small holes instead of a grill. It was never used as it was very likely to get blocked with secretions.
Dr. Brain found that it was relatively easy to cut the epiglottic bars in the silicone Dunlop cuffs (shown on the left) , using the cutting tool shown in the middle. This led to the modern design shown on the right.
The other Brain !
Dr. Archie Brain is a multitalented person. Apart from all the creativity associated with the laryngeal mask, he also composes music, makes his own guitars (see below !) and plays them as well. He likes to paint, make sculptures and the occasional piece of furniture. He also likes to ponder about issues in theoretical physics such as the nature of time. He is fluent in many languages (six ?) and is now learning his seventh : Mandarin (Chinese).
I believe it is the fusion of Dr. Archie Brain’s love of science and creativity that gave birth to the laryngeal mask. Now let us get back to the experimental laryngeal masks.
Gastric channel
The upper airway is shared by the respiratory system and gastrointestinal system, who are generally enemies of each other. It is undesirable for gastric contents to go into the lungs and it isn’t good for air to go into the stomach. Normally the epiglottis and esophageal sphincters keep the peace.
Dr. Archie Brain actually thought of this issue very early in the development of the laryngeal mask. Shown below is Dr. Brain’s first mention of the laryngeal mask concept in his notebooks. You can see that regurgitation was something he was thinking even at the very first moments.
A solution explored was to provide a separate pathway for regurgitated fluid to escape to the surface.
Shown below is an early example of such a channel. The green arrows show the respiratory tube and the blue arrows show the gastric channel. The tip of the gastric channel would protrude into the oesophagus. Dr. Brain considered this too traumatic to use on actual patients.
You can see in the experimental laryngeal masks below, that the esophageal opening is much more gentle than the above design. Also note that in example A in the image below, the airway tube is right above the gastric channel. This makes the mask “tall vertically”. To make it easy to insert, the mask was first turned onto a side (green arrow) and once inside, it was rotated back up. Though this mask provided very high quality seals, Dr. Brain abandoned it because he felt that the vertical tube arrangement was less comfortable for the patient. Example B shows a different design in which there are two gastric channels, one on either side of the airway tube. This made it easier to insert and was much more stable.
Below are some more experimental laryngeal masks where Dr. Brain investigated various oesophageal openings. In the one below, he explored how big he could make the opening.
Dr. Brain tried many experimental laryngeal mask designs to try and minimise interfering with the upper esophageal sphincter. Normally, the esophageal sphincter is closed (green arrows), preventing material regurgitating into the pharynx. The insertion of a laryngeal mask can force open this sphincter ( red arrows) and encourage regurgitation.
The experimental laryngeal mask shown below had a gastric channel with a specially designed oesophageal opening, shown magnified on your right. The opening was such that it was very flexible ( blue arrows) and also had a slight outward force (pink arrow).
Under normal conditions, the opening of the gastric channel would be compressed by the esophageal sphincter, and it would remain closed, as shown in the left image below. However, if the esophageal sphincter opened because the patient was regurgitating, the gastric channel opening would also open at the same time, allowing the material to go through.
The experimental laryngeal mask shown below aimed to maintain the normal shape of the tip of the laryngeal mask to make it easy to insert. Once inserted, gastric fluids could go through the holes into the gastric channel. However, once constructed, Dr. Brain felt that the rubber was too stiff and was likely to cause airway trauma. Therefore it was not used on patients.
Here is another design. In this case, the gastric channel opening has a “lip” extending forwards.
A gastric channel, as shown on the left, can make the front of the laryngeal mask rather “blunt”, potentially making it difficult to insert.
The protruding “lip” in the experimental mask shown before allows the gastric channel to be “sharp” and streamlined.
The “lip”, which is shown in green below, with its streamlined shape, guides the laryngeal mask as it is inserted. This is one of many examples where Dr. Brain was trying to make a design that tried to meet many desirable properties : in this case, having a large esophageal opening while at the same time being easy to insert.
A more radical design that Dr. Brain thought of involved a laryngeal mask with a gastric channel that ended in a cuffed tube that entered the esophagus.
In this design, when the gastric channel cuff was inflated, it would form a tight seal with the esophagus.
Dr. Brain abandoned this idea because he felt that if the patient vomited, the tight seal may prevent a quick enough exit of the gastric material, resulting in high esophageal pressures. Such high pressures could then cause tears or even rupture of the esophagus.
Dr. Brain also tried a very different approach. Instead of trying to divert gastric material out through a tube, he explored the concept of letting the material pass under the laryngeal mask and collect in the pharynx.
Here is an early experimental laryngeal mask showing this concept. The rear of the mask has a groove through which regurgitating gastric material can pass (green arrows).
Here is another design using the same concept. The green arrows show the path regurgitant gastric contents would take.
Intubation aid
It is often thought that tracheal tubes and laryngeal masks are not the “best of friends”. After all, thanks to the laryngeal mask, the need to intubate has declined markedly.
However the reality is very different. While the number of tracheal intubation has declined, there are still clinical indications where it is very necessary to intubate a patient. Far from being enemies, the laryngeal mask, in certain situations, actually helps the tracheal tube achieve its task.
Early in the development of the laryngeal mask, Dr. Brain appreciated that the laryngeal mask directly faced the tracheal inlet. This led to the idea that a tracheal tube which is passed inside a laryngeal mask tube was likely to naturally go into the trachea.
Here is an early experimental laryngeal mask designed to allow intubation. The green bar (pink arrow) is there to prevent the epiglottis falling in and causing blockage. This bar was attached diagonally to allow a tracheal tube (represented by blue arrow) to pass by its side.
I will now be showing you some very unique experimental intubating laryngeal masks. Look at the intubating laryngeal mask below. It has two places to inflate it (arrows). One is to inflate the main cuff (blue arrow). Can you guess what the other inflation port (pink arrow) is for ?
If you look closely, you will see two mysterious “eyes” (red arrows) ! These two “eyes” are actually tiny little balloons. Using a separate inflation tube to the one used for the main cuff (the pink arrow in the image above), you can inflate and deflate these tiny balloons. Can you guess what these balloons were for ?
The mystery balloons are represented by the pink balloon in the image below. In diagram ( A ), while intubating through the laryngeal mask, the tracheal tube is hitting the posterior boundary of the laryngeal inlet and therefore not going into the trachea. In this situation, the balloons can be inflated. As shown in diagram ( B ), the inflated balloons lift the tracheal tube so that it can now pass into trachea.
The next experimental intubating laryngeal mask has three tubes ! The yellow arrow points to the gastric channel leading to an esophageal opening not visible in this image. The green arrow shows the lumen to which you fix the breathing system. While the patient is safely breathing, you can take your time and intubate using the lumen showed by the pink arrow !
Look at this experimental intubation laryngeal mask. Can you guess how this works ?
In this design, you pass the tracheal tube through the tube shown with blue arrows in image below. Now here is the magic. On the side of the breathing tube are small mirrors (green arrows). When you try to intubate, you will see ( yellow arrow) on the mirrors a reflection of the tube passing into the trachea.
Here is another view of this interesting concept. The green arrow shows a “window” through which you would, via the mirrors, see the tracheal tube pass into the trachea. This experimental version was considered too traumatic to use on actual patients. It is important to remember that at the time of this concept, modern low cost miniature camera technology like that found in devices such as the video laryngoscopes were not available. Dr. Brain was trying his best to improvise using the materials available at that time.
The most exotic design !
To me , the next experimental laryngeal mask is the most “beautiful” one. When I first saw it , I just couldn’t make out how it worked. It looked like a creature from the deep sea. It is actually a very “soft” gentle device. The patient gases go through the area labeled as “lumen” in the diagram. There are seven tubes, which are very soft to touch, that surround the lumen. These seven tubes don’t conduct any gases. Instead, they are there to form a soft padded wall around the lumen which is kink resistant. Dr. Brain made this to see how it would look. It was not used in patients.
The story is not over !
As you have seen, the laryngeal mask was not something invented overnight. Dr. Archie Brain spent many years with his mind and hands to bring to reality this marvelous airway device that has transformed the practice of anaesthesia. So many millions of patients have benefited from his invention. When you next use a laryngeal mask or similar device, have a good look at it. Many of the features you see now in modern devices originated decades ago in the experimental laryngeal masks made by Dr. Brain.
I have now come to the end of this section. I hope you have enjoyed this journey as much as I have. However, the story of the laryngeal mask is not over. Like everything else in the world of science, the laryngeal mask and similar devices can be improved further. I hope this web page has inspired you to think of designing the next version !